
If you are looking to make a gift or want to brighten up a room, you cant go wrong with bunting! It is so easy to customize depending on who you are giving it to. I have made quite a few sets of these over the years.
The ones I have been making lately have used two colours on each triangle. I have seen just one colour per triangle or a different colour used for each row resulting in five colours per triangle. It really is completely up to you and the look you want to create. You can also embellish them with bows, flowers or applique.
The ones I have been making lately have used two colours on each triangle. I have seen just one colour per triangle or a different colour used for each row resulting in five colours per triangle. It really is completely up to you and the look you want to create. You can also embellish them with bows, flowers or applique.
I used a 4mm hook and some DK yarn. You can use whatever you have available, although I would say don't use any yarn that is too thin as you will find it harder to sew on letters if you want them. You will notice at the beginning of each new round, I only chain 2 instead of 3 for my beginning treble. I find this looks better as 3 chains is too many and looks out of shape.
To start, Chain 4 and join to the beginning chain to create a circle.
Round 1. Chain 2. Working into the centre of the circle, 2 Treble crochet. Chain 3. 3 Treble crochet. Chain 3. 3 Treble crochet. Chain 3 and join to the top of the beginning chain 2. You should have 3 clusters of trebles with 3 chains in between.
Round 2. Chain 2. Treble crochet into each treble of the previous round. When you reach the corners complete 2 trebles, 2 chains, 2 trebles.
Round 3 - 5. Repeat the same as Row 2. You should be creating a solid triangle shape made up of trebles.
Round 6. This is where I changed my colour for the final row. Its up to you if you change or not but just repeat row 2 again. Weave in ends.
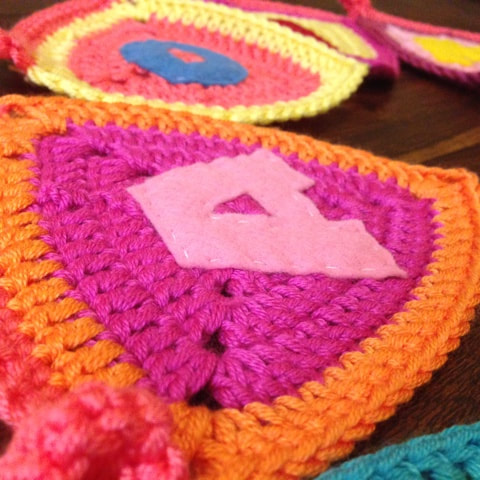
When you have made all the triangles you need for your bunting you can attach letters if you want them to feature a name or greeting. I made my own templates by printing out the alphabet in a font I liked. I use these to trace the letters onto felt and cut them out. I hand sew the felt letters onto the bunting using a running stitch. You can also use a blanket stitch if you like.
To start, Chain 4 and join to the beginning chain to create a circle.
Round 1. Chain 2. Working into the centre of the circle, 2 Treble crochet. Chain 3. 3 Treble crochet. Chain 3. 3 Treble crochet. Chain 3 and join to the top of the beginning chain 2. You should have 3 clusters of trebles with 3 chains in between.
Round 2. Chain 2. Treble crochet into each treble of the previous round. When you reach the corners complete 2 trebles, 2 chains, 2 trebles.
Round 3 - 5. Repeat the same as Row 2. You should be creating a solid triangle shape made up of trebles.
Round 6. This is where I changed my colour for the final row. Its up to you if you change or not but just repeat row 2 again. Weave in ends.
When you have made all the triangles you need for your bunting you can attach letters if you want them to feature a name or greeting. I made my own templates by printing out the alphabet in a font I liked. I use these to trace the letters onto felt and cut them out. I hand sew the felt letters onto the bunting using a running stitch. You can also use a blanket stitch if you like.
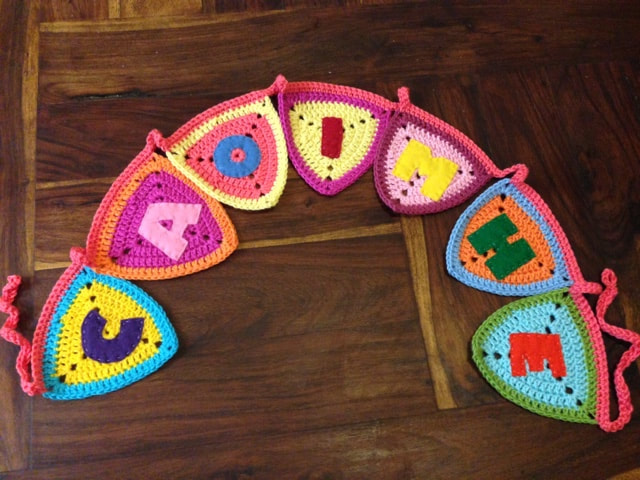
You can now begin joining the triangles.
With your joining colour, Chain 8 and join to the beginning chain. (This creates a little loop which will help you to hang up the bunting. Adjust the number of chains if you need a bigger or smaller loop.) Continue to create chains, I like to make about 15 chains at the beginning before I join my first triangle. However many you do here, remember to do the same number at the end of the line of bunting.
Now join a triangle, arrange your triangles in order and choose the LAST triangle to use first. Single crochet into the top right corner. Single crochet into each treble across the top of your triangle, single crochet into the top left corner.
Chain 10. (or however big you want the gap to be between triangles)
Repeat the joining process for the rest of the triangles, and making chain 10 gaps in between each one.
When you have joined your last triangle, chain the same amount that you did at the beginning, for me that was 15. Then chain 8 extra and slip stitch to the number 15 chain to create a loop at the end.
Turn you work and begin to single crochet across every chain and single crochet of your joining row. This will leave you with a thin row across the top of your triangles. When you reach the end loop again, cut yarn and weave in ends. If you want a thicker joining row, either use treble crochet stitches or do more rows of single crochet.
If you have a go at making these please do share your photos with me! Tag me @sharkyknowscrochet on social media.
Enjoy!
 RSS Feed
